Welcome to this CodeGeass Photoshop Signature tutorial. We will be using a code geass character, a large render, and special filter effects to achieve the final result.You can download the specific signature render that we’ve used
[You must be registered and logged in to see this link.] The signature was the idea of: ZeroTypeX23
Not made by him.

Start by creating a new file in Photoshop (File > New), our size was set to 420 pixels by 130 pixels. The first few steps will be used to create some detail in the signature, we will then continue changing colors and lighting.

Apply some sort of texture on the canvas to get some detail. Here, a cracked texture was used.

We’re going to use some splatter brushes, with a bright red color. It’s best to create new layers (CTRL + SHIFT + N) every time you brush, so you keep maximum control of the looks.

Some more splatters on a new layer with the same red bright color.

Change the blending mode of the last splattering to Multiply:

We’re going to add a cinema4d render on the signature. You can find some renders in our resources section. The render that was used can be found
[You must be registered and logged in to see this link.]
Change the blending mode of the render to Screen:

:STOP!:
Render used:

:Continue:
Add your render to the signature. The good thing about this render is that we can work with his hand to create some special effect. Try finding a render that has some activity in it that you can use.

Add another render on top of character, and rotate it (CTRL + T) to follow the flow of the character (in this case, his arm):

We’ve added the [URL="https://2img.net/h/i754.photobucket.com/albums/xx182/ZeroTypeX/c4drender.png"]same render[/URL] that we’ve added a few steps back on top of the signature again, and used the eraser tool to remove some areas covering our Code Geass character.

We’re going to create a glowing sphere in her hand. Select the brush tool, and pick a decent size soft brush:

With a yellow color, tap once on top of his hand:

Apply a bright outer glow to it, with the following settings:

This is what the sphere looks like on a black background:

We will be erasing some of it to make it seem as if its inside of his hand. To make the erasing a little easier, CTRL + Click on the layer of the character. This will turn it into a selection.

Zoom in and carefully erase with a small brush, parts of the yellow sphere:

Using the smudge tool, we will be creating some sort of light flow that comes out of his hand. First, tap again with a soft brush, then use the smudge tool to create some light flow coming out between his fingers:

This is the light brushing shown on a black background:

Result shown on the signature:

Apply the same outer glow that we used earlier:

Outcome of the glowing sphere in his hand:

We’re going to make his eye color match the red background a little more. Pick a small brush, and tap on top of his eyes with a bright red color:

Set the blending mode to Color, and reduce the opacity to 80%:

Play around with the settings a little. This is our image with an Ocean Ripple applied:

Now erase most of it, keep some sections of the render surrounding our character, and the light sphere coming out of his hand:

Change this layers blending mode to Lighten:

We’re going to add a Color Balance adjustment layer. You should be using your own settings, as our settings probably won’t work for your signature. Here are our settings anyway to illustrate an example. To create a color balance layer, select Layer > New Adjustment Layer > Color Balance:

Outcome of the color balance adjustment layer:

We don’t want the Color Balance to cover the code geass character. Click on the adjustment layer, and start brushing with darkish grey over your character:

This is our outcome:

Time to add another color to the signature. We will be using a Hue/Saturation adjustment layer for this. To create a Hue/Saturation layer, select Layer > New Adjustment Layer > Hue/Saturation…
In the adjustment layer, select Master from the dropdown menu, and move the Hue bar around.

Our outcome:

We’re going to use a splatter brush to hide some part of the Adjustment layer. Select the layer mask:

And tap with a black color on the layer. This will hide the adjustment layer:

We think the signature is a little too dark. Using another Hue/Saturation layer, we will lighten it up a little. Once again, select Master from the dropdown menu, then drag the Lightness Bar:

You should also move the saturation if this makes the signature too greyish.

Add some text to your signature. Select the eyedropper tool to pick colors from your signature:

To finnish it up, select the Dodge and Burn tool, and add some lighting.

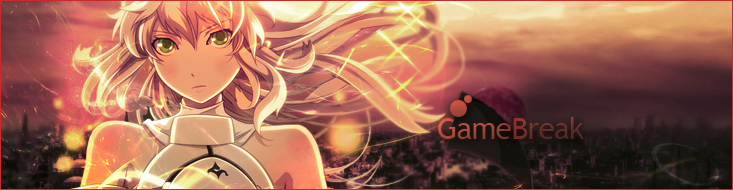
Go crazy, use some brushing or adjustment layers if you think that finishes it. Sharpen if needed. Our final outcome:

We hope you’ve enjoyed this tutorial.
Render used:
Credits to: RnelTutorials and SignatureStop.com
For more info Visit my website. PM ME if you want to know.
- Quote :
- The signature was the idea of: ZeroTypeX23
Not made by him.
Means I can repost it.